
Eight years ago, I bought my first gravel bike — a 2017 Devinci Hatchet Carbon — just as gravel riding was taking off. Since then, and especially over the past four years of deep diving into bikepacking, that once-racy build has evolved into a fully customized adventure machine. From gearing upgrades and suspension tweaks to storage solutions and comfort enhancements, this post takes a detailed look my gravel bike upgrades — and what lessons I’ve learned along the way. Whether you’re new to gravel or refining your current rig, you’ll find inspiration for making the most of the bike you already own.
8 years on from getting my first gravel bike and 4 years on from getting into bikepacking, how have I adapted and altered the bike to suit my needs?
It’s sometimes said that the best bike for gravel riding (or bikepacking) is the bike that you have right now. In my case, that bike is a 2017 Devinci Hatchet Carbon, a bike firmly in the first wave of gravel bikes from major manufacturers that started appearing in the mid-2010s.

The Hatchet in its original trim back in 2017.
Back then, riders and manufacturers likely didn’t foresee how gravel bikes really revolutionized what people could actually do with bikes. Or how diverse the entire gravel discipline would become, ranging from full on professional-level racing to road and off-road bikepacking. I’ve dabbled in gravel from both racing to big off-road bikepacking adventures, and my cycling interests has veered more towards the latter over the past four years.
![]()
The Hatchet in racier trim in 2024 at the TransRockies Gravel Royale. New wheels, derailleur & cassette, cockpit, and saddle. Much more changes coming!
Over the years, my Hatchet has become the bike of Theseus, with so many changes that only the frame and seatpost remain original (The Ship of Theseus is a philosophical thought experiment about whether an object is the same object after all of its original components are replaced over time). So how have I taken a first-wave gravel bike and optimized it to my interests over the past eight years? What lessons can we learn?

The Hatchet in full bikepacking mode summer 2024 in Iceland.
Upgrading Gearing for Modern Gravel and Bikepacking
Maybe this is a consequence of both age along with the expansion of terrain opened up by gravel bikes, but the original low gear capacity of 34×32 on the Hatchet is now laughably archaic and knee busting on most gravel climbs.

34×32 low gear is just laughably high for modern gravel bikes.
The best change I did to the bike that opened up cycling terrain and enabled bikepacking was switching to a Shimano GRX derailleur from the original 105. That enabled a new low gear of 34×40. This wider gearing, along with the 2x setup of 50×34 chainrings, just provides so much more ability to spin up climbs and save the legs and knees over a long day on the bike.
Lesson Learned: Yes, pro roadies are putting dinner plates for chainrings up front. Toss your macho attitude aside and put that dinner plate on your cassette instead. You’ll never regret adding lower gears off-road.
Adding Comfort: Why I Swear by a Suspension Stem
The second best upgrade to my bike has been my Redshift suspension stem. As my Devinci is quite limited with 40 mm tire clearance, I can’t take the route of increasing suspension by widening my tires and dropping pressure. On rougher gravel, the suspension really helps reduce the buzz and improve handling and comfort. This was a godsend on my recent bikepacking trip on the north end of Vancouver Island, which was all on rough gravel logging roads with a fully loaded bike.

My original review summed up my feeling about suspension stems perfectly: “Though adding weight, the increased comfort for long days on the gravel is for me a more than worthy trade.”

Rough roads are going to chew your tires up whether you’re riding suspension or not.
Lessons Learned: The people who deride gravel suspension haven’t tried it for the large part. For me, it is a huge benefit to handling and comfort.
The Braze-On Problem: Adapting an Older Frame for Gear Storage
Judging from the lack of braze-ons on my Hatchet, most bike designers weren’t anticipating the boon that gravel bikes have been for bikepacking back in the mid-2010s. Or the need to strap as many things to the bike in as stable a fashion as possible.

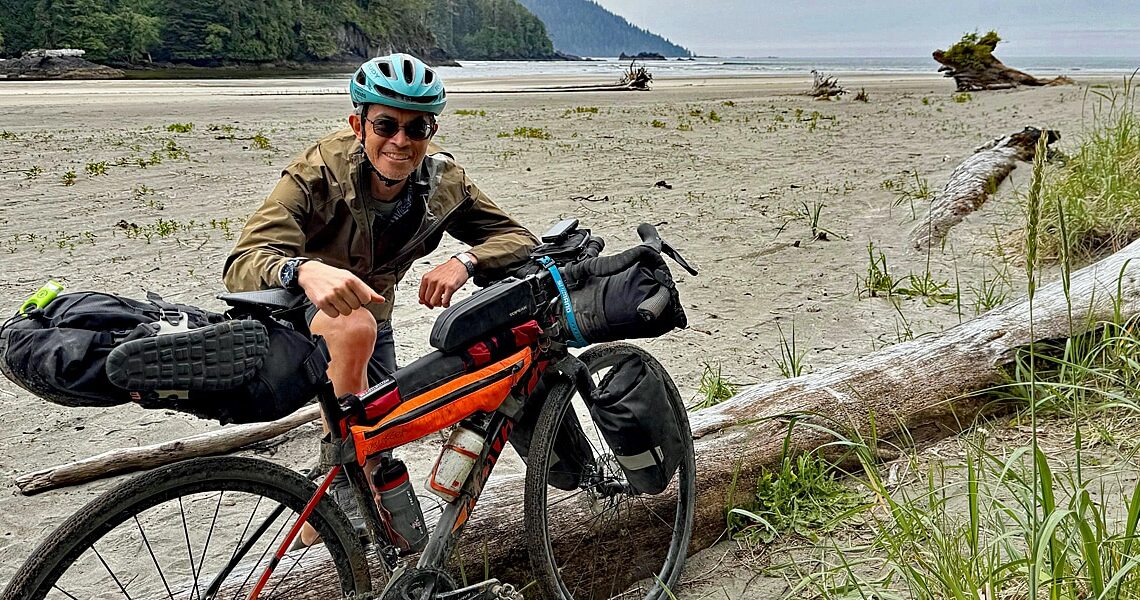
The Hatchet fully loaded for my June 2025 adventure on the Tree to Sea loop on the north tip of Vancouver Island.
My Hatchet has only the basic two bottle braze-ons, along with braze-ons on the seatstay and forks for mounting fenders. In contrast, modern non race-focused gravel bikes have braze-ons everywhere: forks, top tube, down tube underside, seatstays, and even in-tube storage.

A lot of things going on along the top tube.
There’s no way to retrofit, but top tube bag braze-ons are boss. I find that I have yet to try a top tube bag that didn’t annoyingly sway side to side when attached by straps. Then there’s also the issue of top tube bag straps conflicting with the straps for a frame bag.

From Rear Panniers to Fork Bags: Finding Better Weight Distribution
For bikepacking, there are several options now for rear pannier racks that are specifically designed to be relatively universal, mounting onto bikes without the need for braze-ons. I used the Aeroe Spider Pannier Rack when I needed to haul a lot of gear (5 days worth of food plus cold/rain gear) in Iceland. Did I love them without reservation? They did the job but I have a few hesitations about always relying on them:
- I’m a bit leery about strapping the rack tightly onto thin carbon seatstays, and then loading a lot of weight onto it with loaded panniers. In fact, many specifically warn against use with carbon frames.
- The top panniers rack had a design such that they required panniers with really wide spacing on the top latches, requiring me to buy a new set specifically based on that criterion.
- The little plastic attachment to latch the bottom of the panniers to was hard to keep in place and rattled a lot. This led to a lot of wear over 5 days and the panniers becoming detached a few times.

New Fork, New Possibilities: Upgrading with the No. 6 Adventure Fork
For this year, I was lucky to get my hands on the No. 6 Adventure gravel fork. Besides being light (440 g) and able to fit 700Cx50 mm or 650b x 2.3” tires, the three braze-ons on each fork leg meant that I was able to fit fork bags.

While smaller in volume capacity and less weight-bearing (my Topeak 5.8L Drybag has max weight capacity of 3 kg each) than rear panniers, I found that I was much happier with them than with panniers:
- The weight distribution is better with fork bags, with your centre of gravity lower. This provided better handling, less swaying of the rear end when you stand up, and just less disconnect and lag between the front and back of the bike when loaded.
- To keep the centre of gravity as low as possible, for my recent Vancouver Island trip I put my food and cookset into these bags. This allowed me to keep my clothes in my saddlebag, so there was more volume but less weight up high.
- I lost about 10 L of volume going with fork bags and ditching the rear panniers. Whether this is a benefit or a penalty depends on the conditions (weather, food supplies) you’re tackling, but it forced me to be even more ruthless and optimized in my packing decisions.
Lesson Learned: Cycling accessories manufacturers are developing lots of great gear, so you can turn almost any bike into a gravel or bikepacking rig.
Lessons Learned: How to Maximize the Bike You Already Have
I hope that this look into how my gravel bike has evolved over the years to suit my purposes inspires you to think about what you truly want to do in cycling, then think about some ways to optimize your existing bike to maximize that fun. It might be aerodynamic tweaks for fast riding, getting a quality bike fit so that you can finally ride all day pain-free, or experimenting with tires and tire pressure.

Your bike is your canvas to express your unique cycling style and personality. Embrace it and enjoy!
The post 8 Years on Gravel: How I Transformed My Devinci Hatchet for Bikepacking Adventures appeared first on PezCycling News.